In this article, I will show a step-by-step tutorial of how to use AI Clone function of a2e.ai
What is AI Clone?
An AI clone of a specific user is an approach to creating his / her videos without the person’s physical presence or speaking. AI learns a neural network that is capable of synthesizing audio and images of the specific user. Such learning is accomplished given a short video clip of the user.
A2E’s AI clone is also referred as “instant avatar” or “small sample learning” in other avatar creation website. In academic, such method is called “fine-tuning”.
We have trained a large AI model using the audio and video data collected from thousands of people of different ethics and languages. Such model is referred as the base model. We assign a version to the base model. E.g. V3 as you can see from the video creation tab.
Given new video data of a new user (who is likely not part of our base model training), we start the training process of the base model again with only the new user’s data, so as to learn the face appearance, lip motion, and audio rhythm of the new user. The result of such training process is called “fine-tuned” model. A fine-tuned model is only able to create videos of a specific user while a base model is able to create videos of many users. On the other hand, a fine-tuned model creates much better visual and audio of a specific user than if you directly use the base model.
Step 1: Prepare Data
High quality data is the key to high quality AI clone. Make sure your data is a video clip of the target user speaking from the start to the end.
| Ideal | Bad | |
| Video Length | 60 -120 seconds | less than 60 seconds longer than 300 seconds |
| Face | Containing only front-look face | Side face, swinging face, upside-down face |
| # of persons | only 1 person | Frames with no person at all. Frames with more than 1 person |
| Audio Sync | Audio in sync with lip motion | audio not in sync with lip motion |
| Speaking Volume | Mild and comfortable. Normal person speaking. | Too loud. Too quite. |
| Noise | No noise at all | Background Noise Noise of air conditioner Other people speaking Noise from streets |
| Resolution | 1080p | less than 720p |
| Trim | Starting from a frame in the middle of the person’s speech. Ending at a frame in the middle of the person’s speech. | Starting or ending at a frame when the user stops speech. |
Step 2: Train Voice and Video
2.1 Train the Voice Model

Click “Voice Clone” tab, type a voice name that you can memorize.
Upload the audio that you extracted from the video file. There are a number of free software allowing you to extract audio from a video file. E.g. capcut, VLC player, or ffmpeg
Alternatively, you can record in live by clicking “Start Recording”.
The uploaded audio file should follow these rules:
| Ideal | Bad | |
| Length | 2-5 minutes | < 1 minute |
| Noise | No noise | Background Noise Noise of air conditioner Other people speaking Noise from streets |
| # of persons | only 1 person | Audio containing more than 1 person speaking |
| Speaking Volume | Mild and comfortable. Normal person speaking. | Too loud. Too quite. |
Click “Start Training” and agree the credits that you will pay.
Wait for 1 minutes. Then you can use English. If you want to use other languages e.g. Chinese, you will need to wait for 24 hours.

2.2 Train the Video Model

Click “Video Twin” tab
Click create new. Upload the video of the user.
Hover the mouse over the thumbnail picture. Click Animate.
Wait for ~ 2 hours. Then go to create video tab. Refresh your browsers. You will see the thumbnail of your video clone.

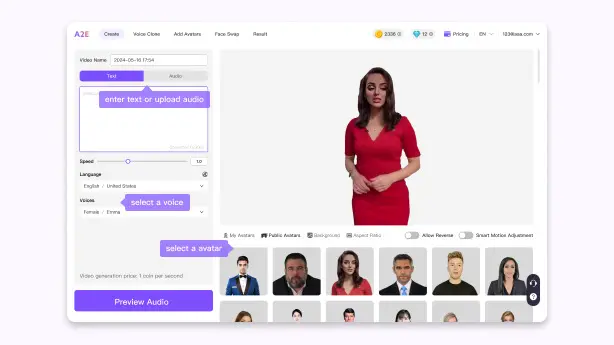
3. Use the AI Clone
Click create video tab. You will see the picture of your video clone with a diamond sticker.

Select your AI clone. Type some text in the text box on the left. Select a proper launguage. Select “Voice Clone / XXX” from the Voices drop menu.
Click “Preview Audio”. Wait till the spinning wait bar finishes. Listen to the audio.
Click “Generate Video” if you are fine with the generated audio. Or click the speaker icon to listen to the generated audio again.

Wait for several minutes for your results. You will receive a success notice by email. Go to “My Assets” tab. View or download your result.